A common pattern to interrupt a long-running task in a console application is to handle the CTRL-C signal using the Notify function from the signal package. You have a channel that is passed to the Notify function, which will receive a signal when a particular event occurs, such as someone pressing CTRL-C. However, there is an even more idiomatic way to cancel long-running tasks using Context, which is a common approach to canceling the entire pipeline of running tasks when making an HTTP request. This can be achieved using NotifyContext:
If you have this error when doing the Quickstart, then above all other recommendations on the internet, check the version of the Hugo as it may be old. The new one uses the hugo.toml as a default configuration file, that’s the one mentioned in Quickstart:
echo "theme = 'ananke'" >> hugo.toml
But, for the old one, you need to save it to the config.toml.
Even after correctly generating SSH keys and ssh-copy-id them to the remote server, connectivity problems may still arise when attempting to connect using the public key. An issue I frequently encounter is when a multiple key files exist within the ~/.ssh directory, causing the SSH client to select the incorrect one for server connection. This can be identified by activating the verbose option while running the SSH client: ssh -v <user>@<server>.
To fix this issue, modify the ~/.ssh/config file to explicitly tell the SSH client to use a designated key file for connecting to the specific remote server:
After switching to macOS completely for development purposes I was annoyed (asweremanyothers, obviously) that you can’t change the scroll direction of the mouse and trackpad independently. Changing one option changes another. So, when I’m connected to the external monitor I want to use a mouse, otherwise, trackpad, meaning, every time the external monitor is connected/disconnected (quite often) I need to go to System Settings, find this option, and toggle it. Sounds easy but still annoying.
Yes, there are some applications recommended on the internet, like one, two, and three. But, I need just to flip the switch and that’s it, just one button to switch the scroll direction. Looking at the source code of those apps seems like they do more than that and somehow try to interfere with the system, to achieve the reverse scroll direction effect based on the device type (mouse or trackpad)
There are multiple AppleScript’s on various forums, but mostly need small tweaks here and there, but the main problem is when you’re trying to run the script and it hangs for a while trying to digest all the System Settings controls, trying to find the correct tab and option, long story short - it takes time and not user friendly.
defaults is a tool to manage system or application preference, it’s a sort of standardized way to store settings in property lists (plists) files. Using this is really straightforward, just pass the read or write parameter in the command line and get/set system option. What is not straightforward is to get the name of the parameter that you’re interested in.
In the case of scrolling mode the name of the property is com.apple.swipescrolldirection.
But, here is the problem - setting up this property doesn’t work. Yes, defaults does update the property, but neither System Settings updates the Natural scrolling option nor the actual scrolling is updated. In my case on Ventura, after updating this option things get messed up, was not able to switch between Natural and Normal modes at all. The reason for this is not hard to understand, updating the property is just a fraction of the overall functionality to switch the scrolling mode.
Ok, so a quick search on the internet led to the setSwipeScrollDirection and the complement swipeScrollDirection function, which is exported from PreferencePanesSupport private framework, which is actually doing all the work except setting the com.apple.swipescrolldirection property. Now, the hard part is done, so the next step is to put the icon in a status bar to flip the scrolling mode on a click and to show the current status: Natural vs Normal mode.
The final implementation is done in Swift using SwiftUI and can be downloaded here. It contains just a couple of lines of code, but solves the problem in the easiest way.
If you don’t want to read the whole thing, just go to the TLDR section with the precise steps on what and how to install/configure.
Debugging the operation system in real time and seeing how interrupts occurs and threads context switching is a fascinating thing I must say. While working on a PingPorts, I was curious how the OS network stack decides when to send a TCP Reset (RST) packet when nobody listens on the port (spoiler alert! See net/ipv4/tcp_ipv4.c file, tcp_v4_rcv function, which calls __inet_lookup_skb and branching to no_tcp_socket). Quickly looking at the TCP/IP implementation in the kernel did not give any specific results, so I decided to setup virtual machine with the latest kernel compiled in debug mode and step in gdb to observe what is happening there. Here is steps to configure VirtualBox, build the Linux kernel and finally debug using gdb.
For the sake of clarity:
Host - The actual physical computer on which a virtual machine is running.
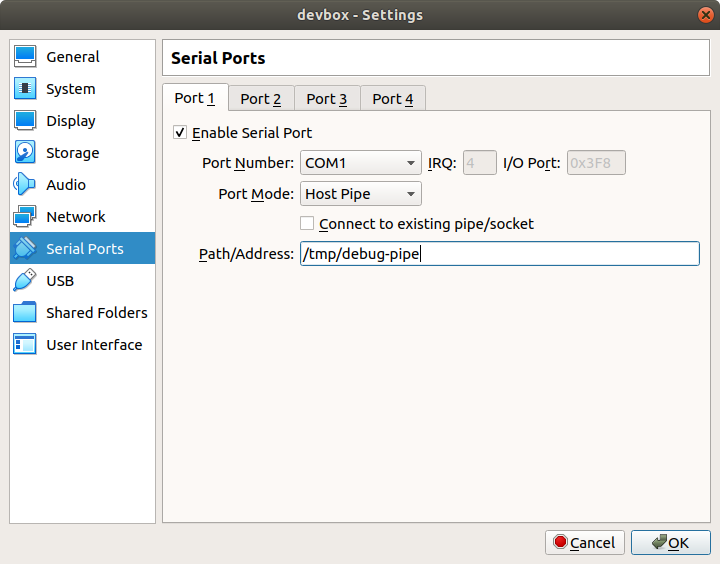
I’ve used Ubuntu as host and guest OS installed on VirtualBox. Make sure you’ve installed Guest Additions on guest to be able to share compiled kernel with host (using Shared Folders settings). After the guest OS is installed, let’s configure the Serial Ports in VirtualBox, so gdb on host can communicate with the guest, let’s call it /tmp/debug-pipe.
Serial port configuration in VirtualBox
The next step is to install all the required software packages on guest, needed to build the kernel: sudo apt-get install git fakeroot build-essential ncurses-dev xz-utils libssl-dev bc flex libelf-dev bison
Go ahead and pick kernel version you want to debug, in my case it was the latest stable version on the time of writing, then, clone the source code on a guest machine: git clone git://git.kernel.org/pub/scm/linux/kernel/git/stable/linux-stable.git.
The configuration .config file in the kernel source root folder must be adjusted, in order to build the debug version of kernel. First, let’s copy existing kernel configuration in guest: cp /boot/config-<your_kernel_release> .config to the root folder with the kernel source code. Then, change the following configuration properties by opening .config file in text editor or running make menuconfig in a source code root folder:
Set CONFIG_DEBUG_INFO to y. As the name says, this will enable including debug information into output executable modules.
Set CONFIG_KGDB to y. This enables built-in kernel debugger.
Comment out CONFIG_RANDOMIZE_BASE, to disabled KASLR. This is needed as gdb will fail to identify the correct address of symbols, when trying to set breakpoints, using function name, etc.
Set CONFIG_GDB_SCRIPTS to y. This will create a symbolic link to the vmlinux-gdb.pygdb helper commands and functions for kernel debugging in a source code root folder.
Set CONFIG_KGDB_SERIAL_CONSOLE to y. This will enable usage of gdb over the serial console.
Now, the final step is to actually start the build process: switch to the root source code directory and run: make and then make modules, this will take some time. Then, once it has been compiled, run the installation process: sudo make modules_install, sudo make install and make scripts_gdb.
On a guest you need to enable debugging support during the boot process by editing the boot settings file: /etc/default/grub. Just append the following line:GRUB_CMDLINE_LINUX_DEFAULT="console=tty0 nokaslr kgdboc=kbd,ttyS0,115200" to the end of the file and reboot the guestto use kgdb over serial console.
Now, the next step is to convert the socket created by VirtualBox (/tmp/debug-pipe) using socat tool to PTY using the following command: socat -d -d -d -d /tmp/debug-pipe PTY,link=/tmp/debug-pipe-pty.
OK, now the PTY is ready on the /tmp/debug-pipe-pty and the final step is to start gdb on a host and attach it to the guest machine.
But first, let’s share the guest kernel source code folder with the host machine, so gdb can load the vmlinux file from this folder.
After the kernel source code folder is available to host machine, run the following command in kernel source code root folder on a host: gdb vmlinux -ex "target remote /tmp/debug-pipe-pty" and immediately run the echo g > /proc/sysrq-trigger on guest machine to debug break in gdb on a host machine.
If everything works fine, there must be the following output from gdb:
How does the packet know where to go from the host computer, whether it’s a desktop workstation or home router to the destination? The answer is the routing table (also called the forwarding table), which contains rules, on where to send the packet, based on the destination IP address. Every hop in the route to the final destination, contains a routing table, to decide where to forward the packet next.
Viewing the routing table is pretty straightforward. Under Linux, using: netstat -r -n or route -n will do the trick. In other OS there must be similar tools.
Here is the output from the netstat running on the local machine:
netstat -r -n
Destination
Gateway
Genmask
Flags
MSS
Window
irtt
Iface
0.0.0.0
192.168.0.1
0.0.0.0
UG
0
0
0
wlp2s0
169.254.0.0
0.0.0.0
255.255.0.0
U
0
0
0
wlp2s0
172.17.0.0
0.0.0.0
255.255.0.0
U
0
0
0
docker0
192.168.0.0
0.0.0.0
255.255.255.0
U
0
0
0
wlp2s0
The most important fields here are Destination, Gateway, Genmask, and Iface, all others are added to show some table-related information and can be examined in manual.
Let’s go over the main fields:
Destination
This field can be anything, the network, particular host, or multi-cast address. This field is matched with the IP address from the source packet to choose what route to take. What does 0.0.0.0 address means? This address has different meanings in a different context, when used in the destination field, it indicates that if nothing matched in the routing table, then you use this one.
Gateway
This field is used to tell whether the destination is on the local network, in this case, it can be directly forwarded to the destination host, otherwise, if it’s on a remote network, then it must be sent to the gateway address, which uses it’s own routing table and will forward data-gram further. What does 0.0.0.0 address means in the gateway? It says that the destination host is directly connected to the network and no need to use a gateway router.
Genmask
A bit mask that is used in combination with a data-gram IP address to find the appropriate entry in a routing table destination field and use the gateway field to decide where to send data.
Iface
The network interface that is used the send the data. In the output above, the wlp2s0 indicates the Wireless card and docker0 is what the name says, the network interface used for Docker.
A better question would be - why do they contain the routing table? Isn’t only the router need to use this table? The reason why hosts need a routing table is to move traffic on the local network, if the destination address is not on the LAN, then we need to send a packet to the gateway, otherwise, just use the destination MAC address and send the packet directly to the destination host.
The routing table can be updated manually (static) or using protocols that are used to find networks and update routing tables on routers (dynamic). A network with a limited number of gateways is a good candidate for static routing. Routes can be added/deleted using route command. Static routing is static, it’s not adjusted to network changes, if it’s needed to react to network changes then dynamic routing is a way to go. Dynamic routing is achieved using routing protocols that can reflect network changes (destination not reachable, new best route available, etc) in the routing table and must be used in large networks if more than one route is can be used to reach the destination.
To list all of the supported wifi adapter modes is easy using the iw built-in Linux tool. But what if you need to do this programmatically? Below, I’ll publish a code snippet on how to list all of them.
The idea is to query the kernel using Netlink for the attributes that define the name of the wireless network interface and a list of supported modes.
The tool sends two messages to the kernel: NL80211_CMD_GET_INTERFACE to get the name of the network interface name and the second one is NL80211_CMD_GET_WIPHY to get the list of supported attributes:
/*
* Copyright (c) 2020 Petro Bagrii
* https://onethinglab.com
*
* View list of wireless interfaces with supported modes.
*
* Compile:
* gcc modeview.c -o modeview -lnl-genl-3 -lnl-3 -I/usr/include/libnl3 -g -Wall -O3
*/#include<stdio.h>#include<signal.h>#include<string.h>#include<stdlib.h>#include<unistd.h>#include<errno.h>#include<netlink/netlink.h>#include<netlink/genl/genl.h>#include<netlink/genl/family.h>#include<netlink/genl/ctrl.h>#include<linux/nl80211.h>#include<linux/if.h>#include<stdbool.h>#define UNUSED(x) (void)(x)
struct netif
{
uint32_t phy_id;
uint32_t supported_iftypes;
char name[IFNAMSIZ];
};
struct dev_list
{
struct netif dev;
struct dev_list* next;
};
struct message
{
struct nl_msg* msg;
struct message* next;
};
struct state
{
struct nl_sock* socket;
struct nl_cb* callback;
struct message* messages;
struct dev_list* devices;
};
staticconstchar* iftype_names[NL80211_IFTYPE_MAX +1] = {
"Unspecified",
"IBSS",
"Managed",
"AP",
"AP/VLAN",
"WDS",
"Monitor",
"Mesh point",
"P2P-client",
"P2P-GO",
"P2P-device",
"Outside context of a BSS",
"NAN",
};
struct state*init_state()
{
struct state* state =malloc(sizeof(struct state));
if (state)
{
state->socket = NULL;
state->callback = NULL;
state->messages = NULL;
state->devices = NULL;
}
return state;
}
voidcleanup(struct state* state)
{
if (state->socket)
{
nl_socket_free(state->socket);
state->socket = NULL;
}
if (state->callback)
{
nl_cb_put(state->callback);
state->callback = NULL;
}
if (state->messages)
{
for (struct message* message = state->messages; message;)
{
nlmsg_free(message->msg);
struct message* msg = message;
message = message->next;
free(msg);
}
state->messages = NULL;
}
if (state->devices)
{
for (struct dev_list* current = state->devices; current;)
{
struct dev_list* dev = current;
current = current->next;
free(dev);
}
}
}
struct nl_msg*alloc_message(struct state* state)
{
struct message** current =&state->messages;
while(*current)
{
*current = (*current)->next;
}
*current =malloc(sizeof(struct message));
if (!*current)
{
return NULL;
}
(*current)->next = NULL;
(*current)->msg =nlmsg_alloc();
if (!(*current)->msg)
{
free(*current);
return NULL;
}
return (*current)->msg;
}
intretrieve_iftypes_callback(struct nl_msg* msg, void* arg)
{
struct dev_list** devices = arg;
struct genlmsghdr *gnlh =nlmsg_data(nlmsg_hdr(msg));
struct nlattr *tb_msg[NL80211_ATTR_MAX +1];
int result =0;
if ((result =nla_parse(tb_msg, NL80211_ATTR_MAX, genlmsg_attrdata(gnlh, 0),
genlmsg_attrlen(gnlh, 0), NULL) <0))
{
fprintf(stderr, "Cannot parse attributes due to error: %d", result);
return NL_STOP;
}
uint32_t phy_id =0;
if (tb_msg[NL80211_ATTR_WIPHY])
{
phy_id =nla_get_u32(tb_msg[NL80211_ATTR_WIPHY]);
}
struct dev_list* current =*devices;
while(current && current->dev.phy_id != phy_id)
{
current = current->next;
}
if (!current)
{
current =malloc(sizeof(struct dev_list));
if (!current)
{
return NL_STOP;
}
current->dev.phy_id = phy_id;
current->next = NULL;
current->dev.supported_iftypes =0;
if (!(*devices))
{
*devices = current;
}
else {
struct dev_list* dev =*devices;
while(dev->next)
{
dev = dev->next;
}
dev->next = current;
}
}
if (tb_msg[NL80211_ATTR_IFNAME]) {
strncpy(current->dev.name, nla_get_string(tb_msg[NL80211_ATTR_IFNAME]),
IFNAMSIZ);
}
if (tb_msg[NL80211_ATTR_SUPPORTED_IFTYPES]) {
struct nlattr* nested_attr = NULL;
int remaining =0;
nla_for_each_nested(nested_attr, tb_msg[NL80211_ATTR_SUPPORTED_IFTYPES], remaining)
{
current->dev.supported_iftypes |=1<< (nla_type(nested_attr));
}
}
return NL_OK;
}
intfinish_callback(struct nl_msg* msg, void* arg) {
UNUSED(msg);
bool* finished = arg;
*finished = true;
return NL_SKIP;
}
intmain()
{
struct state* state =init_state();
if (!state)
{
fprintf(stderr, "Cannot allocate state");
return EXIT_FAILURE;
}
state->socket =nl_socket_alloc();
if (!state->socket)
{
fprintf(stderr, "Cannot create socket");
cleanup(state);
return EXIT_FAILURE;
}
if (genl_connect(state->socket) <0)
{
fprintf(stderr, "Failed to connect to netlink socket.\n");
cleanup(state);
return EXIT_FAILURE;
}
int family_id =genl_ctrl_resolve(state->socket, "nl80211");
if (family_id <0) {
fprintf(stderr, "Nl80211 interface not found.\n");
cleanup(state);
return EXIT_FAILURE;
}
state->callback =nl_cb_alloc(NL_CB_DEFAULT);
if (!state->callback) {
fprintf(stderr, "Failed to allocate netlink callback.\n");
cleanup(state);
return EXIT_FAILURE;
}
bool message_received = false;
nl_cb_set(state->callback, NL_CB_VALID , NL_CB_CUSTOM,
retrieve_iftypes_callback, &state->devices);
nl_cb_set(state->callback, NL_CB_FINISH, NL_CB_CUSTOM,
finish_callback, &message_received);
uint8_t commands[] = { NL80211_CMD_GET_INTERFACE, NL80211_CMD_GET_WIPHY };
for (unsigned cmd =0; cmd <sizeof(commands) /sizeof(uint8_t); cmd++)
{
struct nl_msg* msg =alloc_message(state);
if (!msg)
{
fprintf(stderr, "Cannot allocate netlink message");
cleanup(state);
return EXIT_FAILURE;
}
genlmsg_put(msg, NL_AUTO_PORT, NL_AUTO_SEQ, family_id, 0,
NLM_F_DUMP, commands[cmd], 0);
nl_send_auto(state->socket, msg);
message_received = false;
while (!message_received)
{
int result =0;
if ((result =nl_recvmsgs(state->socket, state->callback)) <0)
{
fprintf(stderr, "Error occurred while receiving message: %d", result);
cleanup(state);
return EXIT_FAILURE;
}
}
}
printf("List of wireless interfaces:\n\n");
for(struct dev_list* current = state->devices; current; current = current->next)
{
printf("Interface %s | List of supported modes:\n", current->dev.name);
for (enum nl80211_iftype iftype = NL80211_IFTYPE_UNSPECIFIED;
iftype <= NUM_NL80211_IFTYPES; iftype++)
{
if (current->dev.supported_iftypes & (1<< iftype))
{
printf("%s\n", iftype_names[iftype]);
}
}
printf("\n");
}
cleanup(state);
return EXIT_SUCCESS;
}
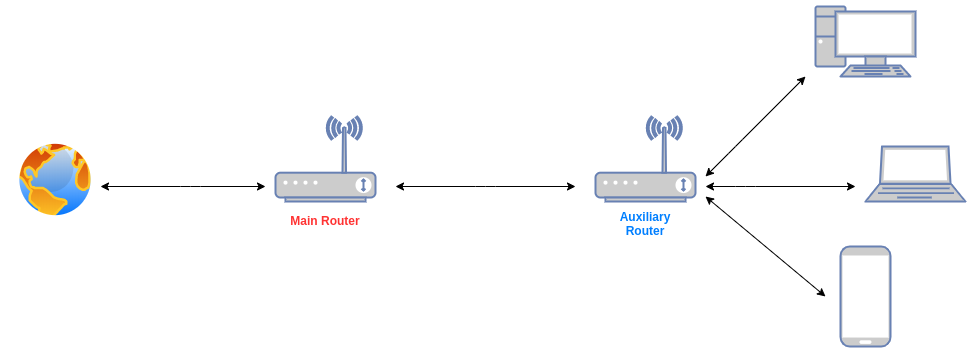
If you have a spare Wi-Fi router to the main one, you can link both together to access the internet. Some use cases:
Extend the Wi-Fi range to cover areas that were not covered by the main router. This is often the case when you got a free router from the internet provider.
Turn the secondary router into the guest router, not all routers have the guest built-in feature. So, you can share your Wi-Fi password without fear of exposing your password for the main router.
Linking one router to another is pretty straightforward, here are the steps with an explanation of how and why to do this:
In the main router - adjust the DHCP address pool start IP to make a room for the secondary router IP address, ex. 192.168.0.10 - 192.168.0.254. That’s needed because the secondary router’s IP address must be fixed and not dynamically allocated.
In the secondary router - disable DHCP, that’s needed to prevent the conflict when both routers start allocating an IP address for the new device.
In the secondary router - set the Gateway IP address that is not in a range of DHCP start/end pool allocation addresses.
In both routers select different channels to prevent interfering with each other.
Connect both routers using a network cable, use LAN ports, not WAN ports.
Now, you can connect to the Wi-Fi using a secondary router and check in the router admin interface - traffic that is going through (number of packets, bandwidth, etc).
The SVG zoom effect is easily achievable using d3js or svgjs libraries, there are many code snippets out there on how to do it properly. But what about doing this on a raw SVG file without running mentioned libraries? That’s what I was doing in setupmap, processing raw files to implement a variety of features.
But, before we start, make sure you are familiar with viewBox and viewPort, and how changing size one of them, affect the other.
This is the original image - a red dot in the center of the black background:
The red dot is not in the center of ViewPort anymore, that’s because the ViewBox became “larger” or the relation of ViewPort to ViewBox coordinate system has been changed (scaled in 1.5 times).
To return the red dot to the center of the rectangle we need to shift it, according to different parameters, like viewport/viewbox size, the radius of the circle, the original location of the circle, etc. Shifting can be done using translate definition of transform attribute:
So, it was easy, to get the zoom effect, you scale and shift using some predefined location. But, how to get the shift values? Here is a Python code snippet that is doing just this. The function arguments are self-explanatory and the output is two numbers that must be used in translate definition.
$> aptitude search boost
p libboost1.55-all-dev - Boost C++ Libraries development files (ALL)
Which is far from the latest. To install the newest Boost version (including all libraries), you need to download the latest source code from Boost website (currently the latest version is 1.69.0).
$> cd /tmp/
$> wget https://dl.bintray.com/boostorg/release/1.69.0/source/boost_1_69_0.tar.gz
$> tar xzvf boost_1_69_0.tar.gz
Now you need to specify where to put the included headers and libraries, after compiling the source code.
$> ./bootstrap.sh --prefix=/usr/
Let’s build the source code (that takes a while).
$> ./b2
The final step is to install the headers and libraries or copy them to the location specified with the –prefix command line option.
 Serial port configuration in VirtualBox
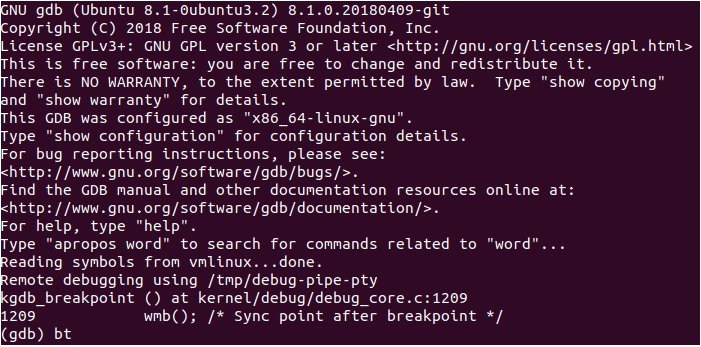 GDB on host system connected to guest